
WS2012 Storage - NFS Server - Configure NFS for VMware vSphere 5.1 Home Lab
This post was published in 2013 and may be outdated.
 The following procedure show how to setup aNFS Server hosted on Windows Server 2012 forbackend storage of myVMware vSphere Server 5.1 Home Lab.
You can also check my post onCreating an iSCSI Target Server on Windows Server 2012.
Overview
In the following post I will talk about the following points:
*Terminology *Using PowerShell *Add the Role NFS Server Feature on Microsoft Windows Server 2012
- Create the Share and Set the NFS permissions *Add the NFS datastore to VMware vSphere 5.1 *Using the GUI (Graphical User Interface) *Add the Role NFS Server Feature on Microsoft Windows Server 2012
- Create the Share andSet the NFS permissions
*Add the NFS datastore to VMware vSphere 5.1
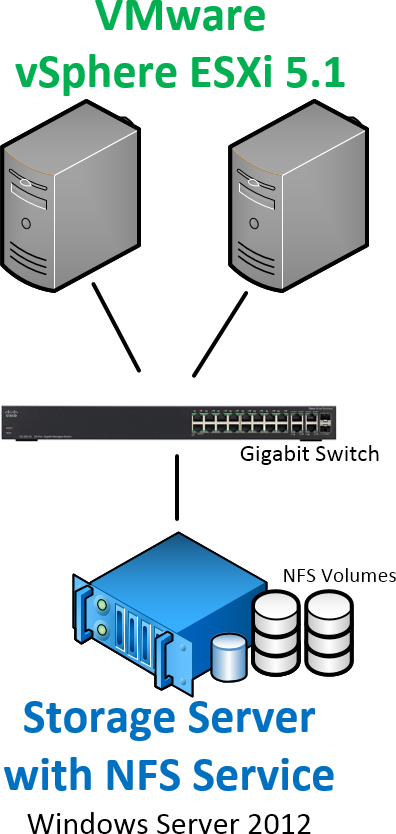 |
| Quick overview of my NFS Service architecture in my Home Lab |
Terminology
Before I start, if you are not familiar with NFS, W2012or vSphere 5.1, please check the following links:
- NFS stands fo Networ FileSystem Wikipedia
- Windows Server 2012 - Server for NFS
- What’s New in vSphere 5.1 - Storage
Using PowerShell
Adding the “Server for NFS” Role on Windows Server 2012
First you will need to add the Windows Feature to handle the NFS Service and shares. Launch PowerShell as Administrator and run:
Add-WindowsFeature "FS-NFS-Service"
(Add-WindowsFeatureon technet)
 |
# Get a list of all the Cmdlets available for this module
Get-Command -Module NFS
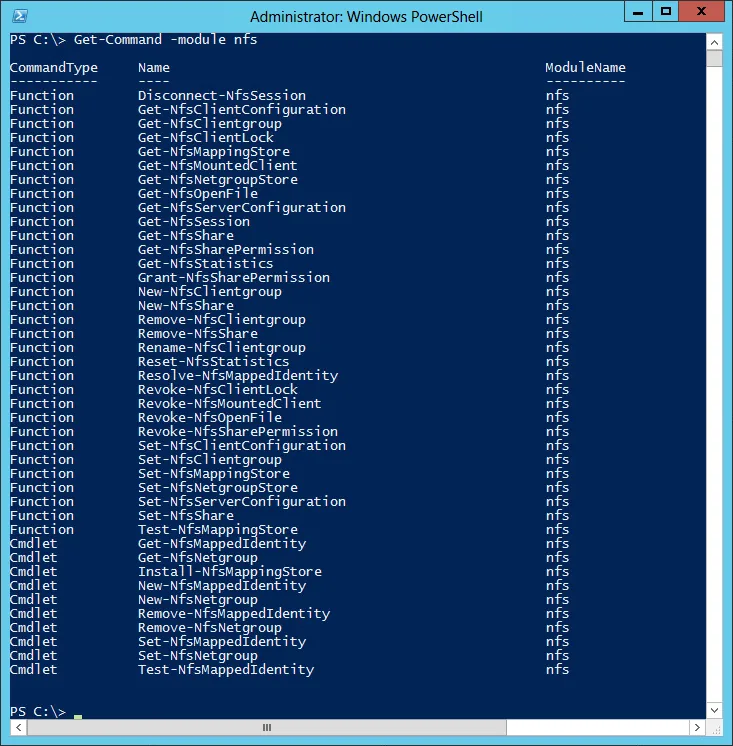 |
| Windows Server 2012 was delivered with PowerShell 3.0. This new version comes along with a dedicated NFS Module!! Find above the Cmdlets available. |
Creating a Share and Set the NFS Permissions
# Now we need to create a new share and set the permission to allow client
# to connect to it. Here I used a folder I created E:\NFS_MOUNT

New-NfsShare `
  -Name "NFS_MOUNT" `
  -Path "E:\NFS_MOUNT" `
  -AllowRootAccess $true `
  -Permission Readwrite `
  -Authentication all
(New-NfsShareon Technet)
 Add the NFS Share to your vSphere Lab
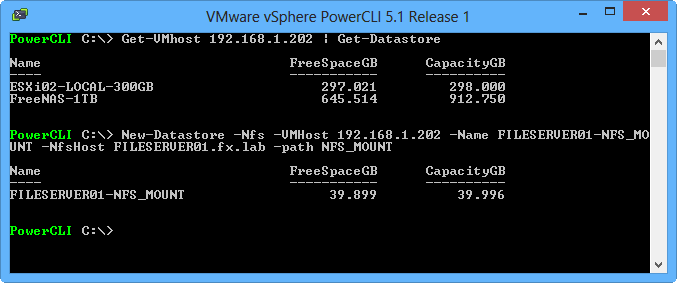
Finally we will need to add the new NFS share in our VMware vSphere host.
$VMHOST = "192.168.1.202" # VMware vSphere host where to create the datastore

$NFSDatastore = "FILESERVER01-NFS_MOUNT"
# name that you want to give
$NFSServer = "FILESERVER01.fx.lab"
# ip of fqdn of the NFS Server
$NFSSharename = "NFS_MOUNT"
# Share created on the NFS Server
New-Datastore `
  -Nfs `
  -VMHost $VMHOST `
  -Name $NFSDatastore `
  -NfsHost $NFSServer `
  -path $NFSSharename
Using the User Interface
Adding the “Server for NFS” Role on Windows Server 2012
 |
| Select the featureServer For NFS, undeFile and Storage Services / File and iSCSI Services |
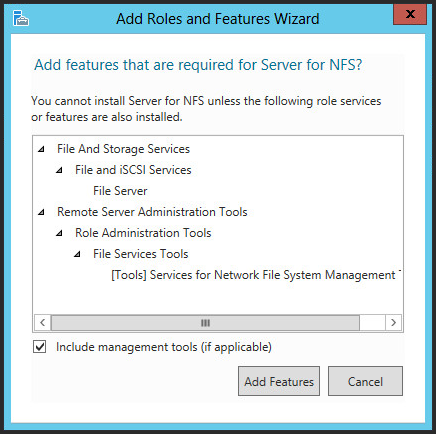 |
| Once you click onServer For NFS, you will be prompted to add the required components, Continue by clicking oAdd Features |
 |
| SelectINSTALL on the review page. |
 |
| When the installation is completed, click onClose. |
Creating a Share and Set the NFS Permissions on Windows Server 2012(GUI)
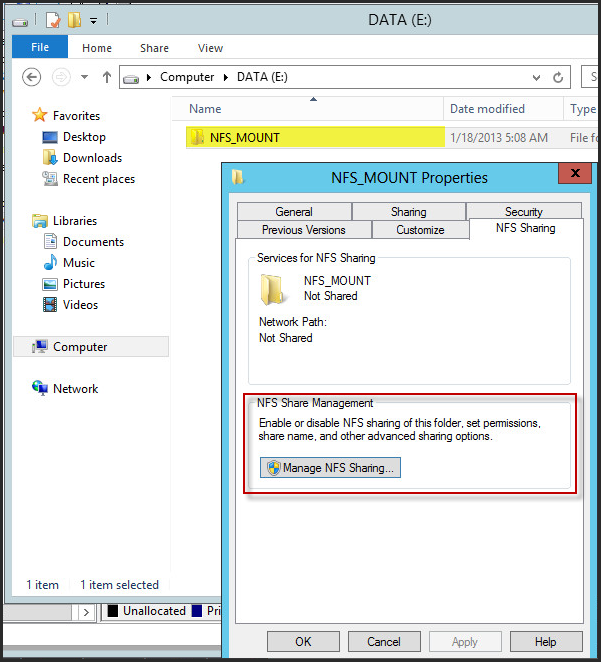 |
| Here I created a folder on the E: Drive calledNFS_MOUNT. Right click on the folder and selectProperties, you will see a new tab calledNFS Sharing Click onManage NFS Sharing |
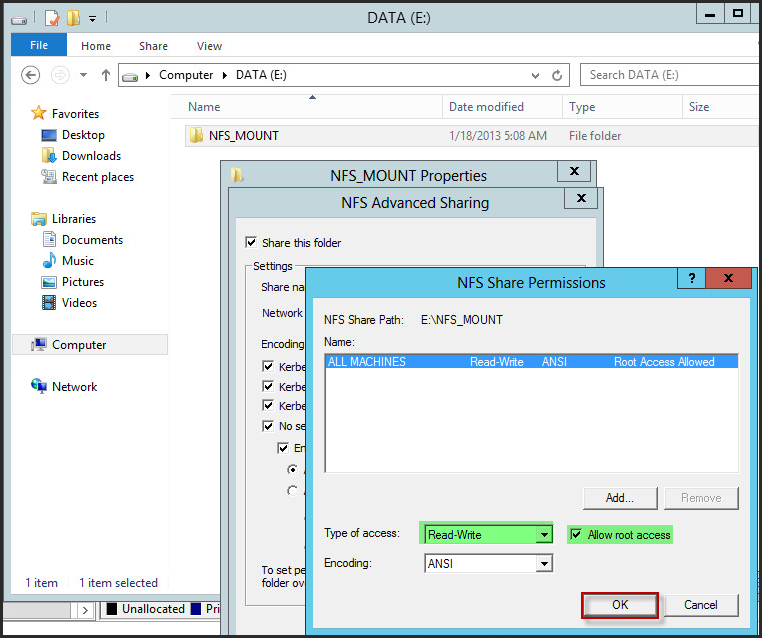 |
| On the NFS Share Permission windows, change the Type of access t READ-WRITE, andCheck the Allow root accesspropertie. ClickOK to complete. |
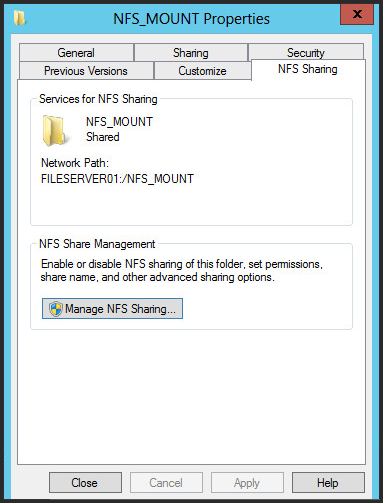 |
| And you are done! Under the "Services for NFS Sharing" area you can find the information about your current NFS share. In my case: FILESERVER01:/NFS_MOUNT |
Add the NFS Share to your vSphere Lab (GUI)
 |
| In vSphere Client, (select your ESXi/Configuration/Storage), Select Add Storage, SelectNetwork File System |
 |
| Enter the information of the NFS Server. |
 |
| Click onFinish to complete the task. |

And that’s it… leave a comment if you have any question.
Leave a comment