
FreeNas 8.3 - Creating a RAID volume and Configure iSCSI
This post was published in 2012 and may be outdated.
 FreeNAS is a tiny Open Source FreeBSD-based operating system which provides free Network-Attached Storage (NAS) services (CIFS, FTP, NFS, …).It supports sharing across Windows, Apple, and UNIX-like systems.
FreeNAS 8 includes ZFS, which supports high storage capacities and integrates file systems and volume management into a single piece of software.
###
Overview
In the following post I will cover the following points:
-
Introduction
-
Terminology
-
Raid Volume Configuration
-
Connecting to the FreeNas HTTP Interface
-
Creating the RAID Volume
-
iSCSI Configuration
-
Adding a Portal
-
Adding an Initiator
-
Adding a Target
-
Adding a File Extent
-
Adding a Target / Extent association
-
Enabling the iSCSI Service
-
Configuring the iSCSI Initiator on VMware vSphere 5.1
Introduction
Using FreeNAS 8.3, I need to create a RAID Volume, configure iSCSI and present it to my VMware VSphere 5.1 environment.
Note: If you are not familiar with some of the iSCSI terms used below (target, initiator, extent…) please check the following webpage:http://doc.freenas.org/index.php/ISCSI
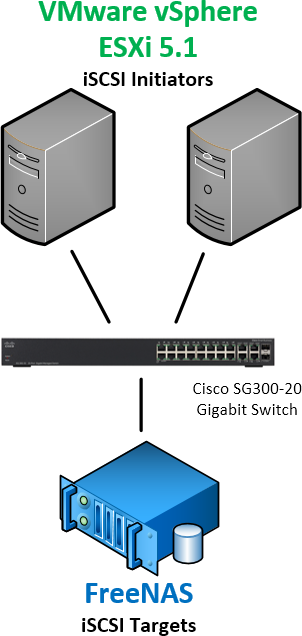 |
| Overview of my iSCSI Lab Architecture |
Terminology
ZFS:is a combined file system and logical volume manager designed by Sun Microsystems. The features of ZFS include protection against data corruption, support for high storage capacities, integration of the concepts of filesystem and volume management, snapshots and copy-on-write clones, continuous integrity checking and automatic repair, RAID-Z and native NFSv4 ACLs. ZFS is implemented as open-source software, licensed under the Common Development and Distribution License (CDDL). -wikipedia- RAID: Redundant Array of Independent Disks is a storage technology that combines multiple disk drive components into a logical unit. Data is distributed across the drives in one of several ways called “RAID levels”, depending on the level of redundancy and performance required. -wikipedia- iSCSI:iSCSI stands forInternet Small Computer System Interface. It’s an Internet Protocol (IP)-based storage networking standard for linking data storage facilities. iSCSI is used to facilitate data transfers over a network (LAN, WAN or Internet) and transferring data by carrying SCSI commands over IP networks. iSCSI leverages the Ethernet network and does not require any specialized hardware. The iSCSI protocol is fully documented bythe RFC 3720andRFC 3721 iSCSI Target Server:is the server that shares the storage, it runs the iSCSI Target. The server (machine) consumes the storage is called iSCSI initiator.
iSCSI Portal:is a targets IP and TCP port number pair. Typically, if the port number is not specified it is defaulted to 3260. Device Extent: A device extent allows a raw partition (volume) to be exported via iSCSI. The advantage of device extent is that they are faster than file extents. The disadvantage is that the entire volume is exported. If you only want to share a portion of a volume using iSCSI, you will need to create a file extent instead.
File Extent:A file extent allows you to export a portion of a volume. When creating a file extent, you specify a file name that iSCSI clients will have access to (similar in concept to a mount point) and the maximum size of that file (storage area). The advantage of file extents is that you can create multiple exports per volume. The disadvantage is that they are slower than device extents.
iSCSI Initiator:Typically, it is an application server. For example, iSCSI Target provides storage to a SQL server, the SQL server will be the iSCSI initiator in this deployment.
Target:It is an object which allows the iSCSI initiator to make a connection. The Target keeps track of the initiators which are allowed to be connected to it. The Target also keeps track of the iSCSI virtual disks which are associated with it. Once the initiator establishes the connection to the Target, all the iSCSI virtual disks associated with the Target will be accessible by the initiator.
IQN:iSCSI Qualified Name. It is a unique identifier of the Target or Initiator. The Target IQN is shown when it is created on the Server.
Raid Volume Configuration
1 -Connecting to the FreeNas HTTP interface
Navigate to Storage/Volumes/Volume Manager and then click on the first button to create your new volume.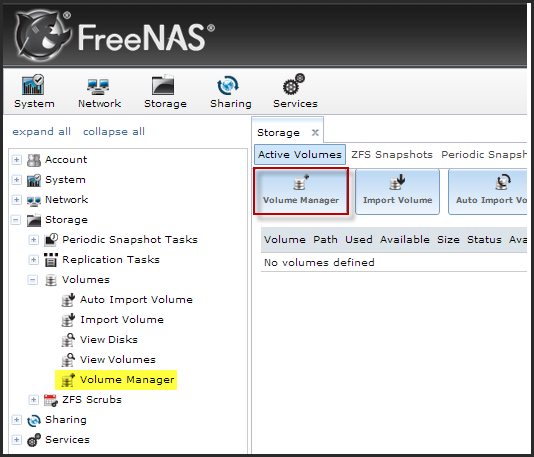
2 - Creating the RAID Volume
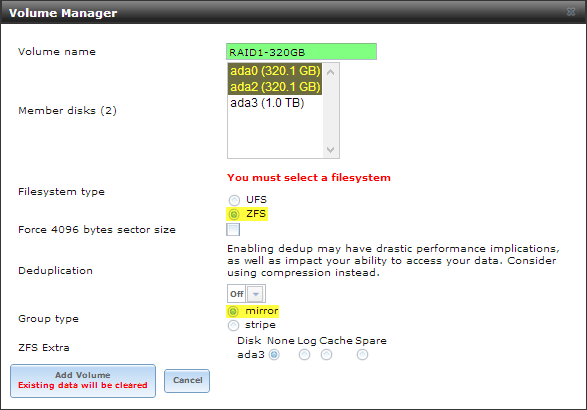
Enter a Volume Name, Select the disks members and choose the FileSystem and Group Type.
Here I want to create a RAID1 (mirror), I will leave the other options as default.
Additional information onRAID, ZFS
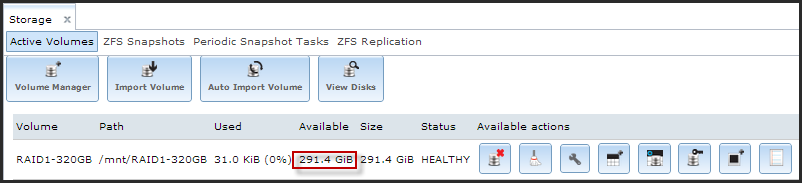
 Once created, 291.4 GB are available.
 ### iSCSI Configuration
3 - Adding a Portal
PortalProvide services on different interfaces or subnets. Can be used to configure multi-path I/O (MPIO), Network access control (Multiple NIC are required)
Navigare toServices/iSCSI/Portal and click on Add Portal
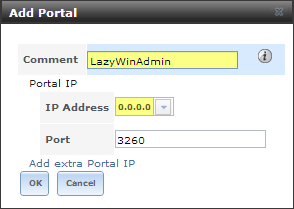
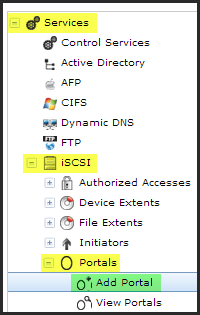 Enter a portal Comment, and select the IP Address 0.0.0.0, so this portal is available from any interface on your FreeNas box. I leave the Port 3260 as default.
4 - Adding an Initiator
Initiatorisa client which has authorized access to the storage data on the FreeNAS system. The client requires initiator software to connect to the iSCSI share.
Navigate toServices/iSCSI/Initiatorsand click onAdd Initiator
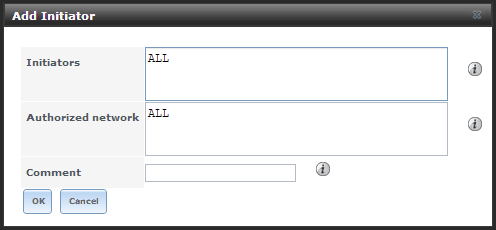
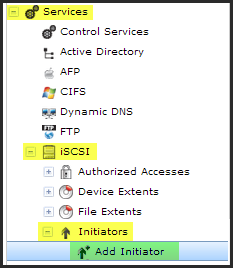 Leave all the default settings and click OK
Note: I recommend that you specify the addresses of the hosts that need to see your LUN. For this lab I left ALL, this mean any machine in my lab that add the iSCSI Target Server will be able to see this LUN.
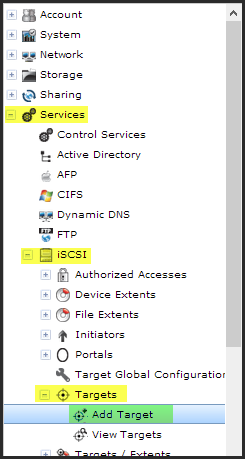
5 - Adding a Target
Targetisa storage resource on the FreeNAS system.Navigate toServices/iSCSI/Targetsand click onAdd Target
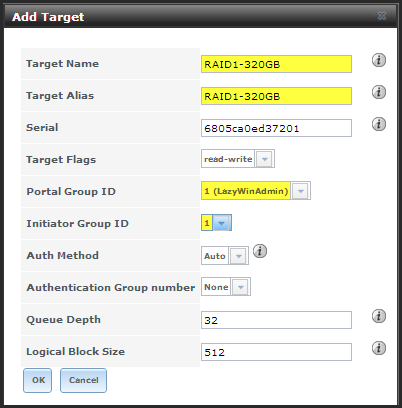
 Add a Target name and a Target Alias of your choice, here i just used RAID1-320GB to match the Volume Name.
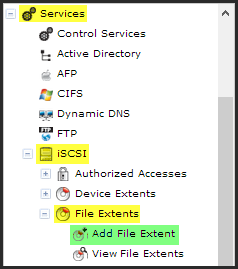
6 - Adding a File Extent
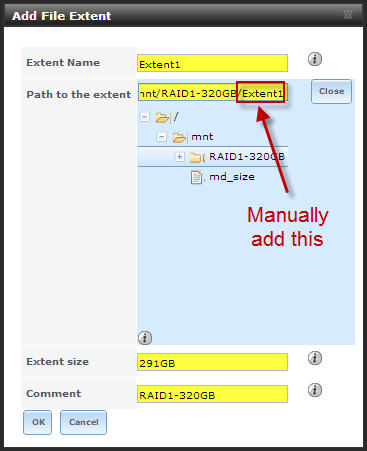
Extentisthe storage unit to be shared. It can either be a file or a device.Navigate toServices/iSCSI/File Extentsand click onAdd File Extent
7 - Adding a Target / Extent Association
Navigate toServices/iSCSI/Target Extentand click onAdd Target Extent
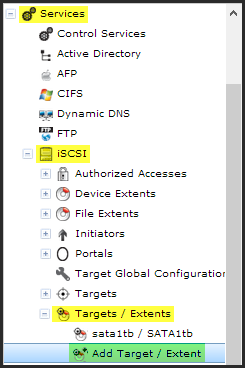 Select the Target and Extent previously created
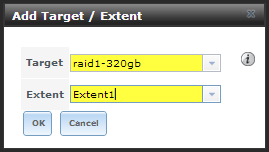
8 - Enabling the iSCSI Service
Navigate to Services/Control Services and verify that iSCSI Service is set to ON
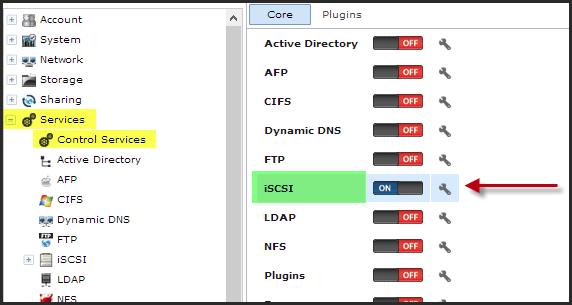 And that's it... now you will need to configure the iSCSI Initiator in VMware
### Configuring the iSCSI Initiator on VMware vSphere 5.1
1 - On your VMware Host, select the tabConfiguration,Storage Adaptersand click onAdd...
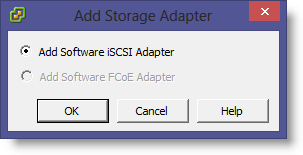
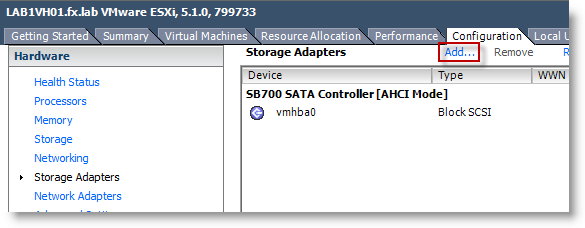 2 - Here leave the "Add Software iSCSI Adapter" option and clickOK
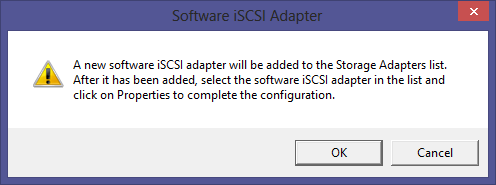
 3 - A warning message will show, clickOK:
"A new software iSCSI adapter will be added to the Storage Adapters list. Adter it had been added, select the software iSCSI adapter in the list and click on Properties to complete the configuration."

You'll see the following message while the Software iSCSI Adapter is being added...
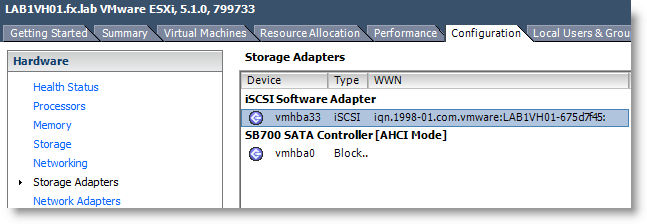
Once added, you'll see the iSCSI Software Adapter with the iSCSI IQN of this server
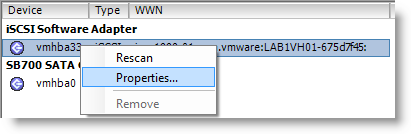
4 - Right click on it and selectProperties
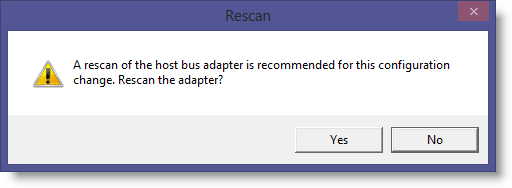
 5 - You'll see the message "A rescan of the host bus adapter is recommended for this configuration change. Rescan the adapter?". ClickYes
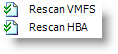
You'll see the above activities in the vsphere client activities window.
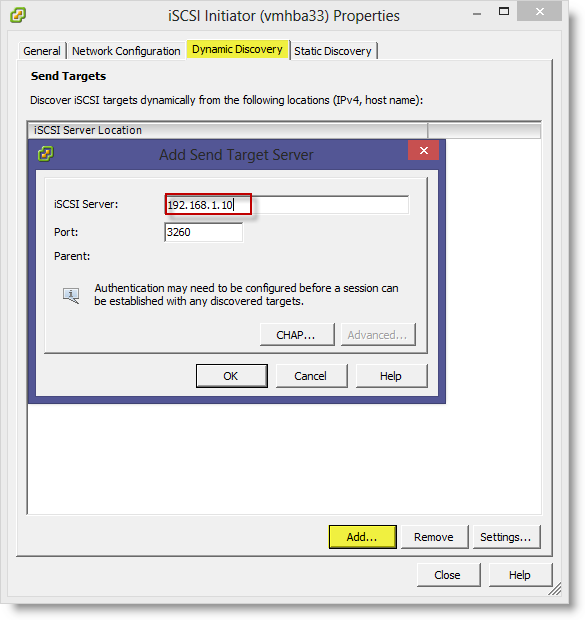
6 - Select theDynamnic Discoverytaband clickAdd...in theSend Targetsarea.
Enter theiSCSI Server(which is my FreeNas Server) and leave the defaultPort3260. ClickOKand clickCloseto continue.
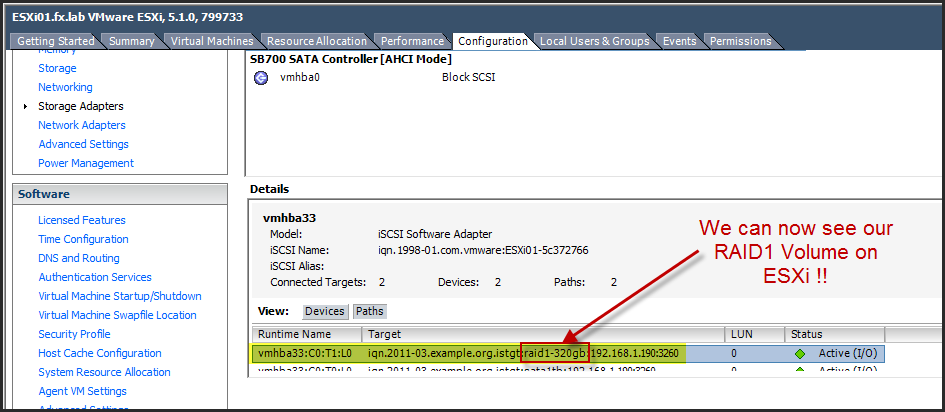
 7 - You will now see the iSCSI LUN presented to your ESXi Server
 Thanks for Reading! If you have any questions please reach out on Twitter:[@lazywinadmin](https://twitter.com/LazyWinAdmin)
Once created, 291.4 GB are available.
### iSCSI Configuration
3 - Adding a Portal
PortalProvide services on different interfaces or subnets. Can be used to configure multi-path I/O (MPIO), Network access control (Multiple NIC are required)
Navigare toServices/iSCSI/Portal and click on Add Portal
Enter a portal Comment, and select the IP Address 0.0.0.0, so this portal is available from any interface on your FreeNas box. I leave the Port 3260 as default.
4 - Adding an Initiator
Initiatorisa client which has authorized access to the storage data on the FreeNAS system. The client requires initiator software to connect to the iSCSI share.
Navigate toServices/iSCSI/Initiatorsand click onAdd Initiator
Leave all the default settings and click OK
Note: I recommend that you specify the addresses of the hosts that need to see your LUN. For this lab I left ALL, this mean any machine in my lab that add the iSCSI Target Server will be able to see this LUN.
5 - Adding a Target
Targetisa storage resource on the FreeNAS system.Navigate toServices/iSCSI/Targetsand click onAdd Target
Add a Target name and a Target Alias of your choice, here i just used RAID1-320GB to match the Volume Name.
6 - Adding a File Extent
Extentisthe storage unit to be shared. It can either be a file or a device.Navigate toServices/iSCSI/File Extentsand click onAdd File Extent
7 - Adding a Target / Extent Association
Navigate toServices/iSCSI/Target Extentand click onAdd Target Extent
Select the Target and Extent previously created
8 - Enabling the iSCSI Service
Navigate to Services/Control Services and verify that iSCSI Service is set to ON
And that's it... now you will need to configure the iSCSI Initiator in VMware
### Configuring the iSCSI Initiator on VMware vSphere 5.1
1 - On your VMware Host, select the tabConfiguration,Storage Adaptersand click onAdd...
2 - Here leave the "Add Software iSCSI Adapter" option and clickOK
3 - A warning message will show, clickOK:
"A new software iSCSI adapter will be added to the Storage Adapters list. Adter it had been added, select the software iSCSI adapter in the list and click on Properties to complete the configuration."
You'll see the following message while the Software iSCSI Adapter is being added...
Once added, you'll see the iSCSI Software Adapter with the iSCSI IQN of this server
4 - Right click on it and selectProperties
5 - You'll see the message "A rescan of the host bus adapter is recommended for this configuration change. Rescan the adapter?". ClickYes
You'll see the above activities in the vsphere client activities window.
6 - Select theDynamnic Discoverytaband clickAdd...in theSend Targetsarea.
Enter theiSCSI Server(which is my FreeNas Server) and leave the defaultPort3260. ClickOKand clickCloseto continue.
7 - You will now see the iSCSI LUN presented to your ESXi Server
Thanks for Reading! If you have any questions please reach out on Twitter:[@lazywinadmin](https://twitter.com/LazyWinAdmin)
2 - Here leave the "Add Software iSCSI Adapter" option and clickOK
3 - A warning message will show, clickOK:
"A new software iSCSI adapter will be added to the Storage Adapters list. Adter it had been added, select the software iSCSI adapter in the list and click on Properties to complete the configuration."
|
| You'll see the following message while the Software iSCSI Adapter is being added... |
|
| Once added, you'll see the iSCSI Software Adapter with the iSCSI IQN of this server |
5 - You'll see the message "A rescan of the host bus adapter is recommended for this configuration change. Rescan the adapter?". ClickYes
|
| You'll see the above activities in the vsphere client activities window. |
 7 - You will now see the iSCSI LUN presented to your ESXi Server
Thanks for Reading! If you have any questions please reach out on Twitter:[@lazywinadmin](https://twitter.com/LazyWinAdmin)
Leave a comment